
Small-Room Layouts
Small Bedroom Dressing Area: A Vanity That Leaves Room to Move
Create a coordinated bedroom dressing corner with a shallow vanity, useful light and a stool that has a parking place. Compare the room at rest and in use.
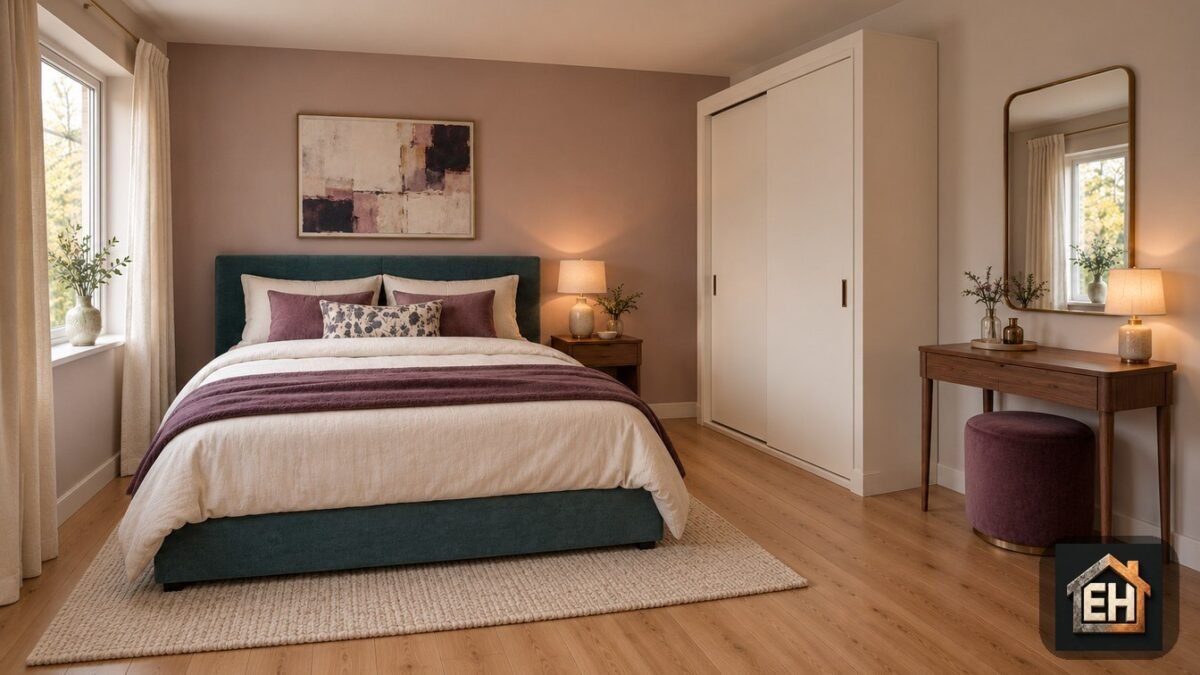
A small bedroom dressing area needs more than a slim table. It needs a place for the stool when you are finished, room to sit and stand, and access to the wardrobe that does not disappear during your morning routine. Start with those three checks, then use the mirror, lighting and finishes to make the corner feel like part of the bedroom.
Our original concept combines a teal upholstered bed, soft plum textiles, a walnut vanity and an ivory sliding-door wardrobe. The room photographs are AI-generated illustrations of a fictional design, not a real home, tested installation or pictures of the retailer products linked below. The plan explains the proposed arrangement; the photographs communicate its style.
Put the vanity beside the wardrobe, not in its way
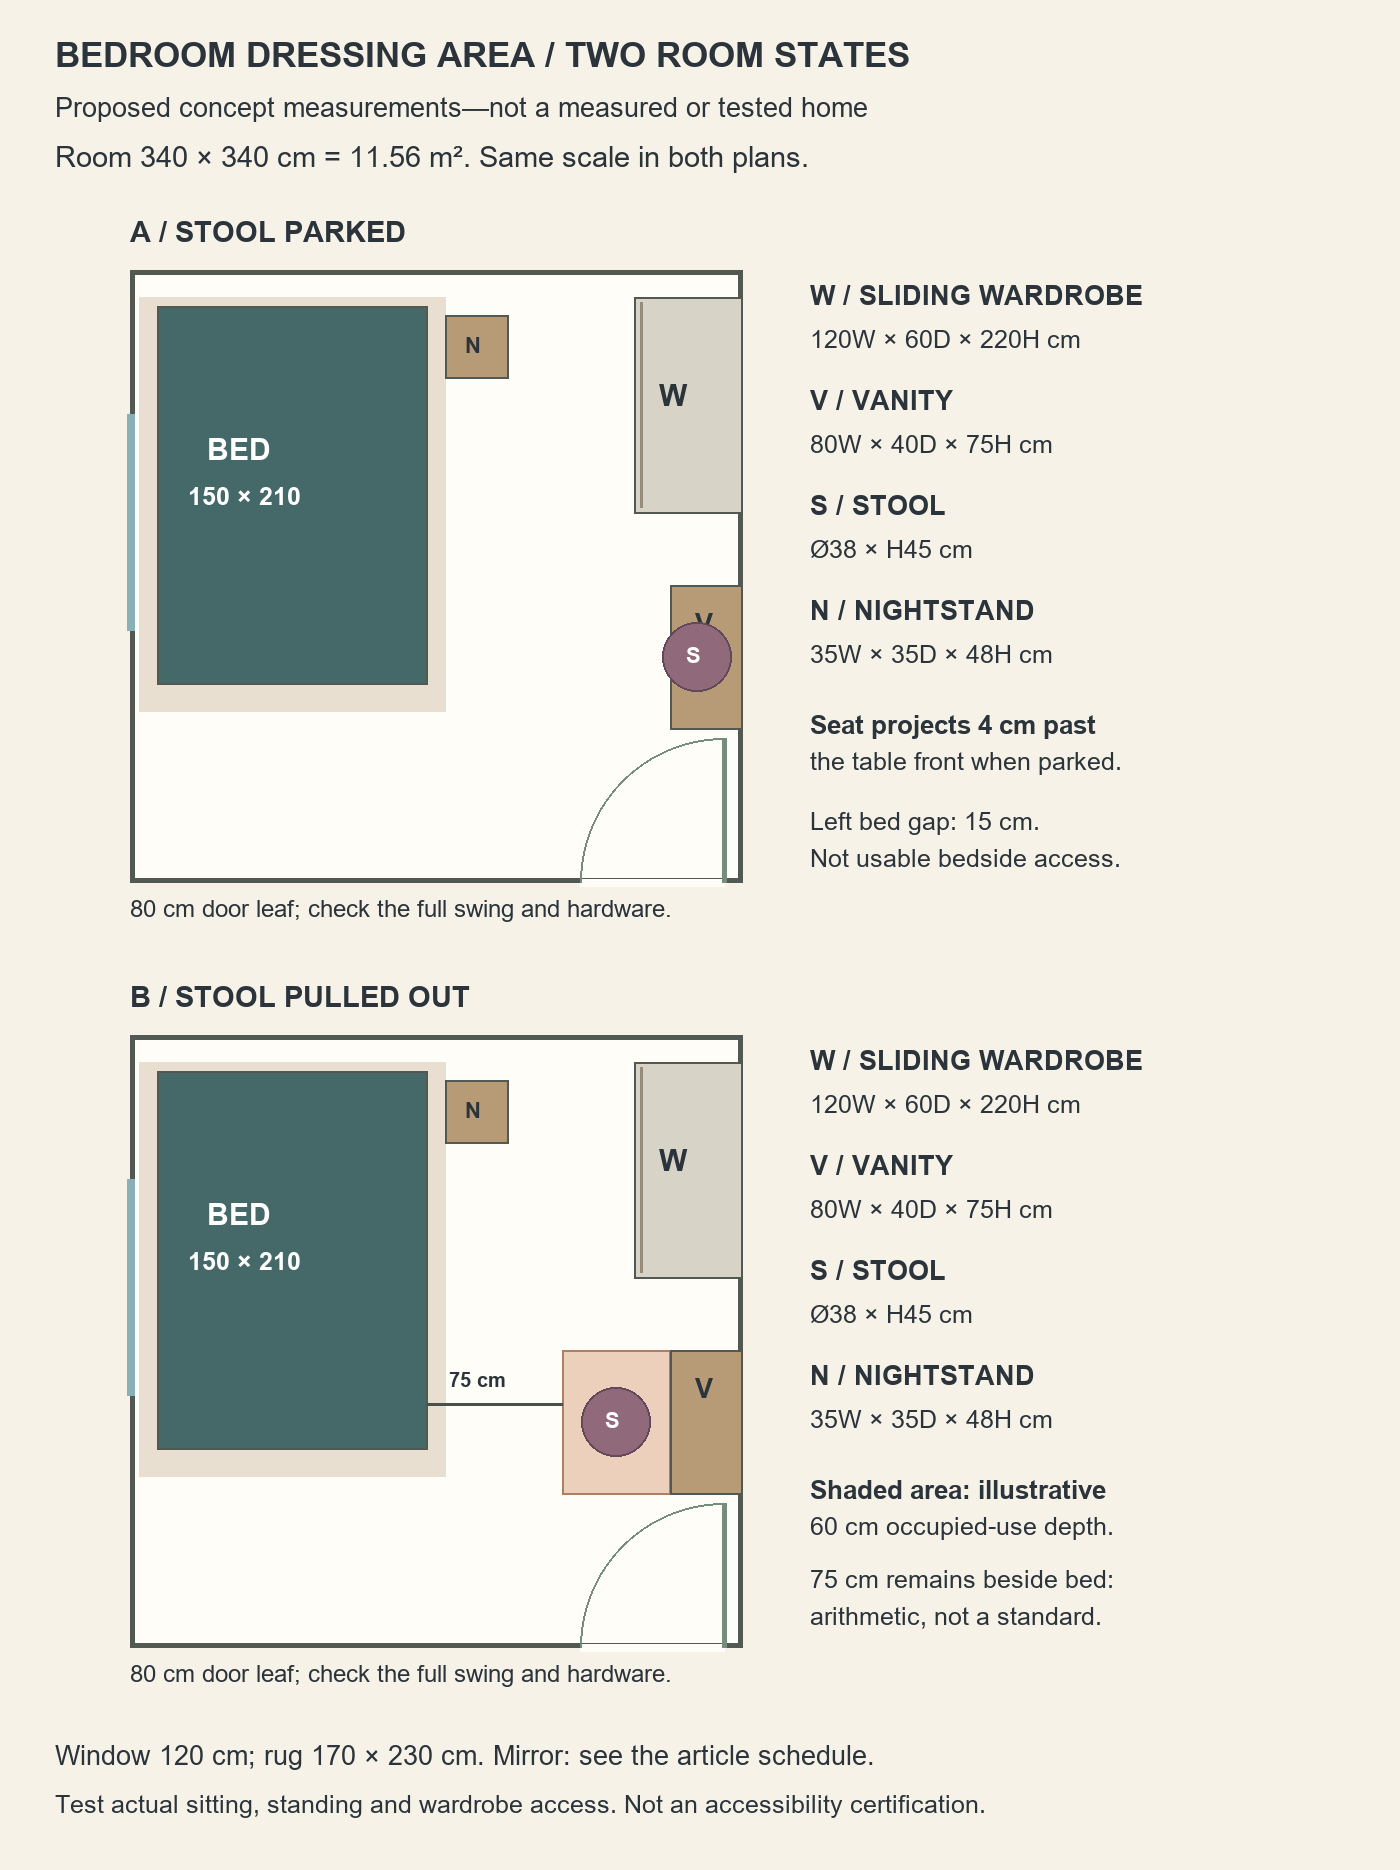
In this room, the bed occupies the left side and the dressing furniture runs along the right wall. The wardrobe is toward the back; the vanity is nearer the entrance, outside the illustrated door swing. That places clothing storage and the mirror on the same side without inserting a large dresser at the foot of the bed.
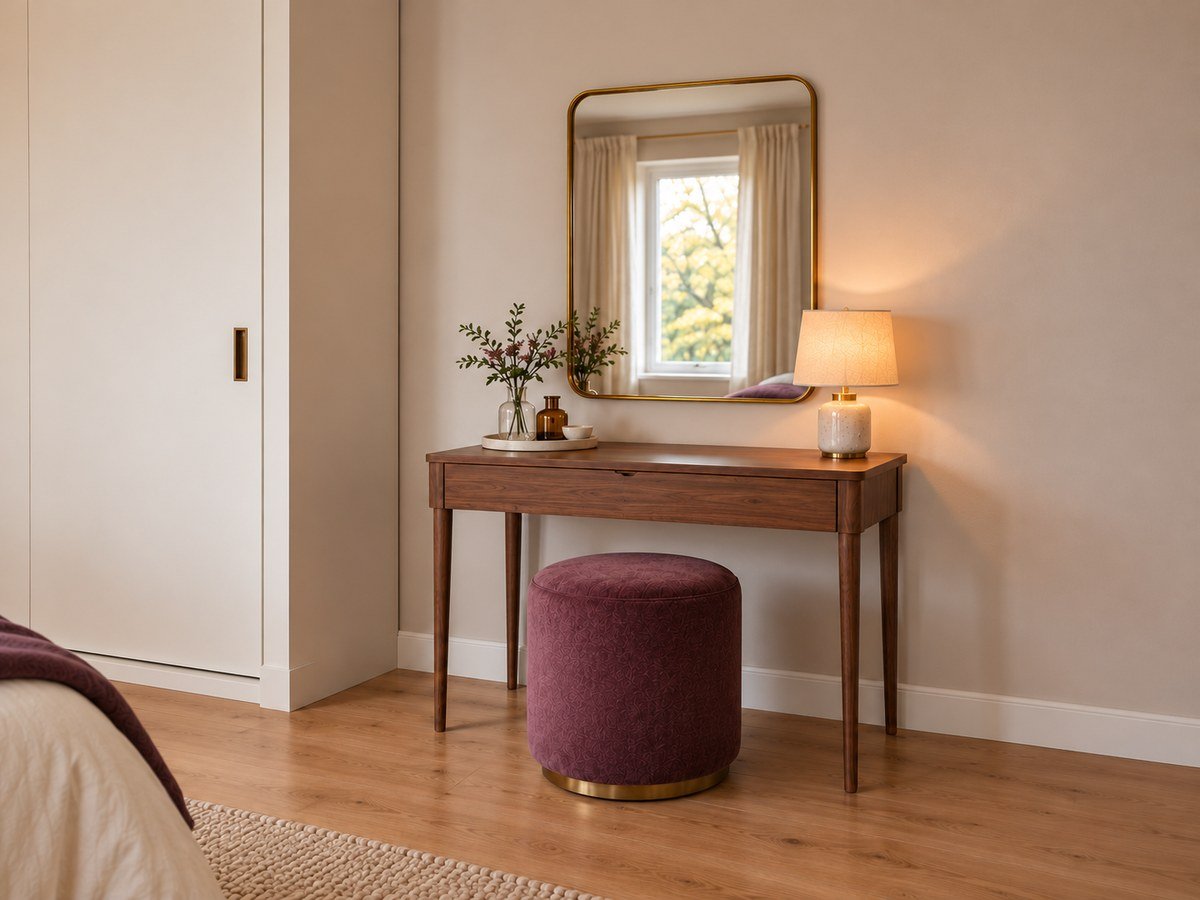
The table is deliberately shallow and open underneath. A wall mirror leaves its small surface available for a tray and useful light. The stool parks mostly under the table instead of becoming a permanent obstacle in the aisle. It can also provide a brief seated place for getting dressed, provided its actual stability and comfort suit the person using it.
This arrangement is for a room where the bed can be accessed from its right side and foot. The proposed left gap is only 15 cm; it is not usable bedside access. If two people need independent access to both sides, or you use a mobility aid, do not copy this plan unchanged. Preserving the bedroom’s essential access matters more than adding a vanity.
A small bedroom dressing area in an 11.56 m² room
Proposed concept measurements—not a measured or tested home. The room is 340 × 340 cm with a 250 cm ceiling. The following schedule was defined before the images; none of these numbers was inferred from generated pixels. Width and depth refer to the complete furniture footprint, not just a mattress, seat or tabletop.
| Element | Size and important limit |
|---|---|
| Room | 340 wide × 340 long; 11.56 m²; ceiling 250 high |
| Bed frame | 150 wide × 210 long; headboard 100 high. Mattress size is not specified |
| Nightstand | 35 wide × 35 deep × 48 high, beside the right of the bed head |
| Wardrobe | 120 wide × 60 deep × 220 high; sliding doors, facing into the room |
| Vanity | 80 wide × 40 deep × 75 high; open underneath, no drawer capacity assumed |
| Stool | 38 diameter × 45 high. Parked position extends 4 beyond the table front |
| Mirror | 60 wide × 80 high; illustrative lower edge 90 above the floor, to be adjusted for the user |
| Window / door / rug | Window 120 wide, sill 100 high; door leaf 80 wide; rug 170 × 230 |
The vanity’s 80 cm width runs along the wall; its 40 cm depth projects into the room. Confusing those two dimensions can turn a supposedly compact purchase into the wrong shape. Include protruding legs, handles and any back rail when checking a real product.
The door arc is a planning sketch, not an installation tolerance. The illustrated vanity ends just 5 cm before the open door leaf’s tip along that wall. Real handles, stops, skirting and imperfect walls can use that margin, so measure the complete sweep and move or shorten the table if necessary. Never depend on the picture to prove that a door will open fully.
Measure the dressing area twice: parked and in use
The stool is not described as disappearing completely. In the proposed parked position its front edge protrudes 4 cm beyond the vanity. A real stool’s legs may spread wider than its seat, and the table’s rails or legs may prevent it sliding as far underneath as expected. Measure the actual opening between the table legs and the clear height under its apron.
For use, the plan moves the stool outward and shades an illustrative 60 cm zone in front of the table. That zone represents the person and the movement involved in sitting and standing; it is not a recommended minimum clearance. Your body, posture and seat can need more room.
Subtracting that illustrative zone from the space beside the bed leaves 75 cm in this particular drawing. That is arithmetic, not an accessibility or safe-passage certification. Rehearse the layout with an existing seat: can you get up without catching the bed, and can another person reach the wardrobe without squeezing past you? If not, use the room sequentially or choose a different arrangement rather than assuming a narrow gap is acceptable.
Sliding doors still need an access zone
A sliding wardrobe avoids a door leaf swinging into the aisle, but you still need to stand in front of it, reach clothes and operate any internal drawers. The plan does not specify internal fittings or capacity. Check the exact wardrobe’s opening width, drawer travel and assembly requirements before treating its outside dimensions as a fit guarantee.
A hinged wardrobe cannot be substituted into this layout without redrawing its door swings. Also check the route used to make the bed, carry laundry and leave the room at night. The vanity should support those routines, not require furniture to be moved out of an essential route every time.
Make the corner useful and visually connected
The teal bed gives this bedroom its colour anchor. A plum stool and throw repeat the softer wall tone, while walnut on the vanity and nightstand connects the dressing corner to the sleeping area. The ivory wardrobe is quieter than either, helping the narrow furniture wall read as a coordinated part of the room.
Keep the tabletop’s centre free for the routine you actually perform. A shallow tray can hold a few daily items; supplies used occasionally belong elsewhere. Avoid filling every spare centimetre with bottles, plants and decorative boxes. There is no useful space saving if getting ready starts by clearing the table onto the bed.
Set mirror height from a seated test
Our concept places a 60 × 80 cm mirror above the table, with its lower edge 90 cm from the floor. This is a proposed composition, not a universal mounting height. Sit on the intended stool and mark where the mirror needs to show your face and upper body. Check it standing too if that matters to your routine, and follow the mirror’s fixing instructions for your wall.
Look at the reflection before choosing the final position. A mirror can bring another view into the room, but it does not increase floor area or compensate for blocked access. Keep it clear of an opening wardrobe door and check whether reflected lamps or daylight are uncomfortable from the bed.
Check the light after sunset
The window provides daytime light, while the small shaded lamp gives the corner a warmer evening character. That is styling, not proof of adequate task lighting. Test the actual lamp while seated: can you see clearly without a glaring bulb or strong shadows across your face? Keep the cable and any charging lead out of the aisle and follow the product’s electrical and positioning instructions.
This is not a long-session home office. If a second work surface is the real need, check chair support, desk depth and screen position separately. Our dining-table home-office guide covers a different work-and-clear-away problem; do not assume a shallow vanity is an ergonomic desk.
A real compact vanity—and why it is not a drop-in match
The IKEA BRIMNES dressing table, UK model 702.904.59, is listed at 70 cm wide × 42 cm deep × 77 cm high. Its hinged top contains a mirror and storage, and IKEA requires the furniture to be wall-anchored with its safety fitting. Manufacturer details checked October 16, 2026.
Compared with our fictional vanity, it is 10 cm narrower, 2 cm deeper and 2 cm higher. It therefore does not fit inside the proposed 40 cm-deep footprint unchanged. Recheck the room with its full depth and the lid and drawer operating space. Its appearance, knee opening and storage arrangement also differ from the illustration. We have not tested it, and do not claim that our pictured stool fits underneath it or that it is available locally.
Use that comparison as a shopping method, not a recommendation based on a photograph. Write down overall width, depth and height; measure the seat’s whole base; then check the two pieces together. For any alternative, verify wall fixing, permitted use and operating instructions. No price, stock, delivery or storage-volume claims are made here.
Before buying: a quick room check
- Protect the existing essentials. Mark the whole bed frame, wardrobe frontage, window access and entrance-door movement.
- Mark the table and parked seat. Include the stool’s widest legs, not just the cushion, and measure what remains visible beyond the table.
- Rehearse the occupied position. Sit, turn, stand, reach the wardrobe and carry laundry past the corner.
- Test the mirror and light. Check your actual seated height, reflected glare, switch reach and cable route.
- Remove the extra furniture if it fails. A mirror and a small tray on an existing suitable surface may serve the routine better than an additional vanity and stool.
If the bedroom must also accommodate a desk or another daily activity, map those uses together first. Our multifunctional room layout guide explains why furniture changeovers matter as much as the tidy final arrangement.
A successful dressing corner feels intentional even when nobody is sitting there—and remains usable when someone is. Choose the room’s movement first, then the furniture, and finally the decorative details.
Original ExstarHub concept. AI-generated room illustrations; proposed measurements are not a measured or tested home. No building, fire-escape or accessibility compliance is claimed. Manufacturer comparison checked October 16, 2026. No affiliate links.
Source: IKEA